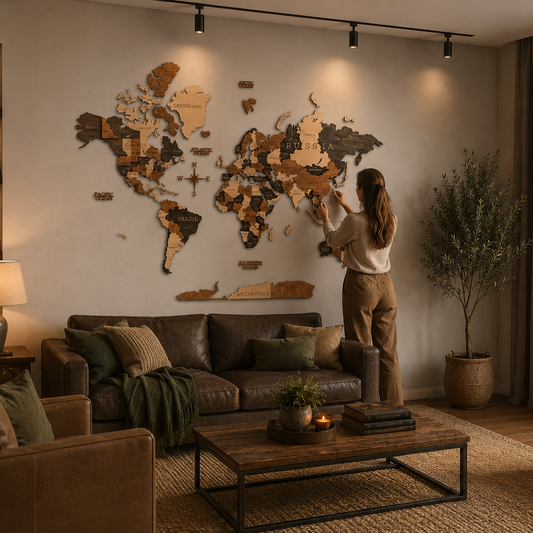
Install Your Map in 5 Steps
The installation of your 3D wooden map is a straightforward and enjoyable process. All that is necessary is a clean wall and the installation kit included with your map; no specialized equipment or prior experience is required. Below is a comprehensive guide:
Required Items
The installation process is entirely seamless, as all essential components are provided within the package. The items you will find include:
- The wooden map pieces
- Double-sided adhesive mounting tape dots
- Stencils for setup
- An easy-to-follow user manual with illustrations
Should you have any inquiries or require assistance, please feel free to contact us via email at your convenience info@the5thflavour.store
Step 1: Prepare the Wall
Prior to initiating the installation, it is essential to ensure that the wall is clean, dry, and smooth. Any dust or debris may hinder the adhesive's ability to adhere properly. Therefore, it is advisable to wipe down the surface with a damp cloth and allow it to dry thoroughly.
Pro Tip: For walls with texture, it may be beneficial to use extra-strong adhesive or wall anchors to ensure optimal support.

Step 2: Unbox and Organize
Carefully unpack the map components and arrange all the wooden pieces on a flat surface. Refer to the installation manual provided to organize the pieces in the correct order prior to installation. This preparatory step will assist in visualizing the final arrangement and contribute to a more efficient installation process.
Taking the time to familiarize oneself with all components will mitigate potential confusion during installation, ultimately facilitating a smoother execution.

Step 3: Use the Positioning Stencils
To ensure a precise and professional installation of your map on the wall, begin by marking and measuring the desired positioning. Your map set includes two stencils; please tape them to the wall to serve as your guide. These stencils are located at the top right and top left corners of the map, as demonstrated in the provided installation guide.
Utilize a measuring tape and level to accurately outline your design prior to adhering any components to the wall. Proper placement of the stencils will facilitate even spacing and perfect alignment of the pieces. Utilizing these stencils eliminates guesswork, resulting in a polished and visually appealing finish.

Step 4: Stick Map Pieces to the Wall
To begin with the installation process, it is advisable to start from both stencils, and add the map pieces piece by piece.
Remove the backing from the provided adhesive tape and apply it to the reverse side of a map piece. Press it firmly into position on the wall. Gradually progress to the smaller pieces, ensuring that each component is aligned accurately for a cohesive final appearance.

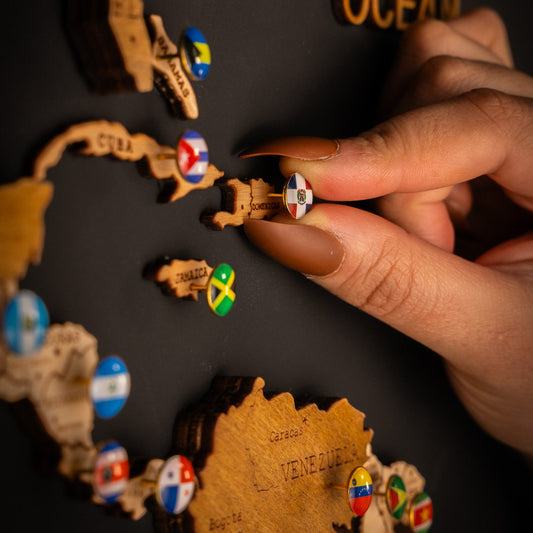
Step 5: Installing the Islands
we developed an easy to use system for the island pieces so that each island comes in the exact position it belongs to. The islands also come in a larger stencil where its position in the stencils corresponds to its number on the installation manual included in the box, so you can position it accurately on your wall.


Step 6: Step Back and Admire
Once all the pieces are in place, take a step back and admire your work. Your 3D wooden map is now a stunning addition to your space, ready to spark conversations and inspire wanderlust.

Why It’s So Easy
No Tools Required
The included adhesive mounting tape means no drilling, no screws, and no damage to your walls.
Foolproof Instructions
The installation manual walks you through every step, making installation stress-free and enjoyable.
Why It’s an Enjoyable Experience:
From Box to Wall in No Time
The installation of a 3D wooden world map is a swift process that typically requires 1-2 hours, even when attention is given to ensuring each detail is perfect. Upon completion, you will have transformed your wall into an impressive centerpiece that is sure to engage conversation. This project is not only quick but also yields remarkable results with minimal effort.
Embarking on the journey of installing a 3D wooden world map is not merely a task; it is a fulfilling experience from start to finish. With a bit of patience and a positive mindset, you can elevate a plain wall into a stunning display that showcases your passion for travel and design. We invite you to begin this enriching adventure by unboxing your map and taking the first step towards enhancing your space.
So grab your map today and have fun creating a wall that speaks volumes about your style and story.
Shop our World and Country Map Collection Now!